![Slinger Bag – The Best Tennis Ball Machine? [REVIEW]](https://fourtylove.com/live/wp-content/uploads/2023/07/slinger-bag-review-1200x675.jpg)
- The Key Points about the Slinger Bag
- It comes with a bag for easy transport and setup.
- A highly affordable alternative to other ball machines.
- The ball machine’s rotation can be expanded with an additional attachment.
Table of Contents
What is a “Slinger Bag”?
The Slinger Bag is a relatively new and highly affordable ball machine from the Slinger company. According to Slinger, their vision is to create an all-in-one ball machine that combines innovative features to be the perfect training partner for every player, all while remaining financially accessible.
Slinger Bag Ball Machine
Varianten
The Slinger Bag ball machine doesn’t come in different versions. There is only the standard Slinger Bag, which I am testing here. However, there are different packages available that increase the scope of the included accessories and balls.
Slinger Bag REVIEW
Let’s finally get to the important part, the reason you’re probably here. The review!
Independent & Unbiased
All products featured on FourtyLove are tested independently by me. I do not favour any brands nor do I receive any money from brands influencing my results. I might earn a small commission if you buy products through my affiliate links.
Versions reviewed
Balls Hit
Hours Reviewed
Readers
The Slinger Bag
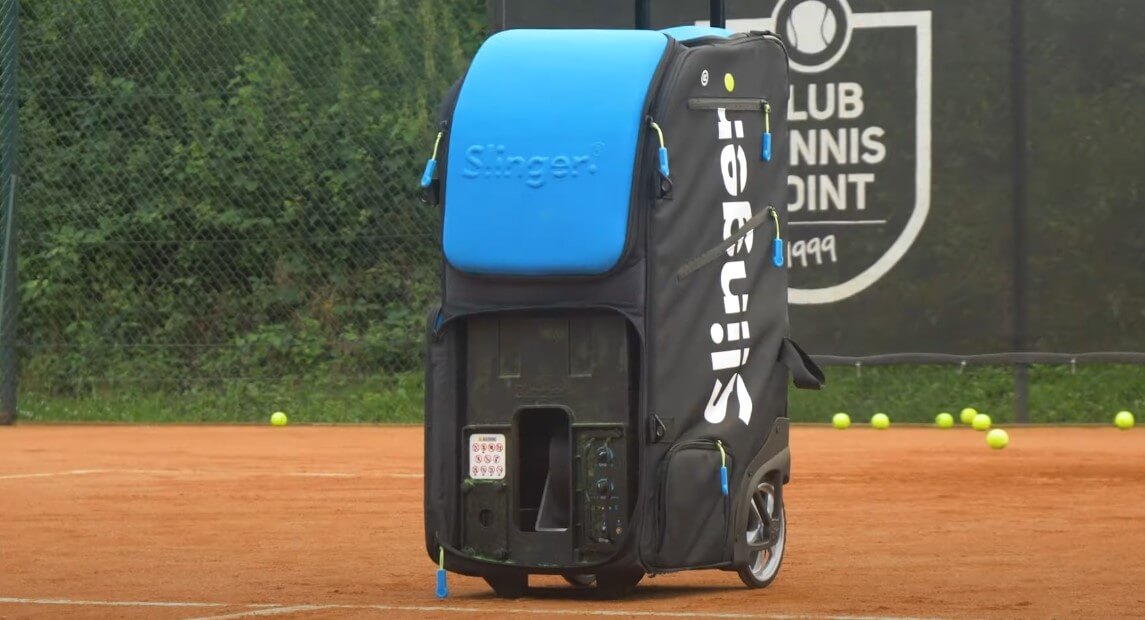
The Slinger Bag features a unique suitcase design, with a ball launch section and a storage compartment above it that can hold approximately 144 tennis balls.
On the back of the bag, there is an upper loading area for tennis rackets, which can accommodate three rackets, along with multiple accessory compartments on the sides to store the charger, remote control key, phone holder, and other small items.
The extendable ball collector, capable of holding 20 balls, is attached to the side, and there are two wheels with a retractable handle on the back of the Slinger for easy transport.
The oscillator accessory comes in a separate bag that can be slid over the extendable handle.
As for the design, I find it very elegant and eye-catching. While most people assume it has something to do with sports, no one outside the tennis world I’ve spoken to knew it was a tennis ball machine.
The model I have is the Grand Slam Pack, which includes:
Slinger Bag Grand Slam Pack
- Slinger Launcher (ball launching device)
- Remote control
- Oscillator (rotational device)
- Ball tube (for 20 balls)
- Camera mount
- Charger
Slinger Bag Specifications
- Weight: 33 lbs (without balls)
- Dimensions: 14 inches x 18 inches x 34 inches
- Ball Speed: 10-45 mph
- Battery: Lithium, lasts approximately 4 hours
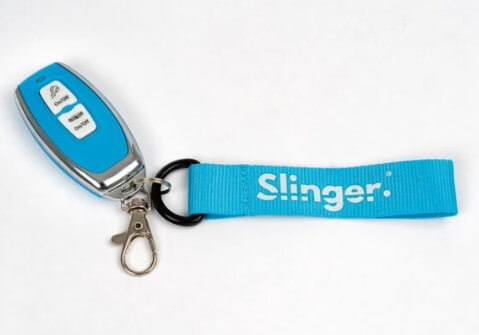
- Control: Time between ball throws and speed adjustment on the machine, remote control for power on/off and oscillation
- Adjustable launch angle: 10 – 40 degrees
- Variable ball feed rate from 2 to 7 seconds
- Holds up to 144 balls
Slinger Bag Settings

Setting up the Slinger is straightforward. First, make sure it is fully charged by plugging in the charging adapter and letting it run before your game.
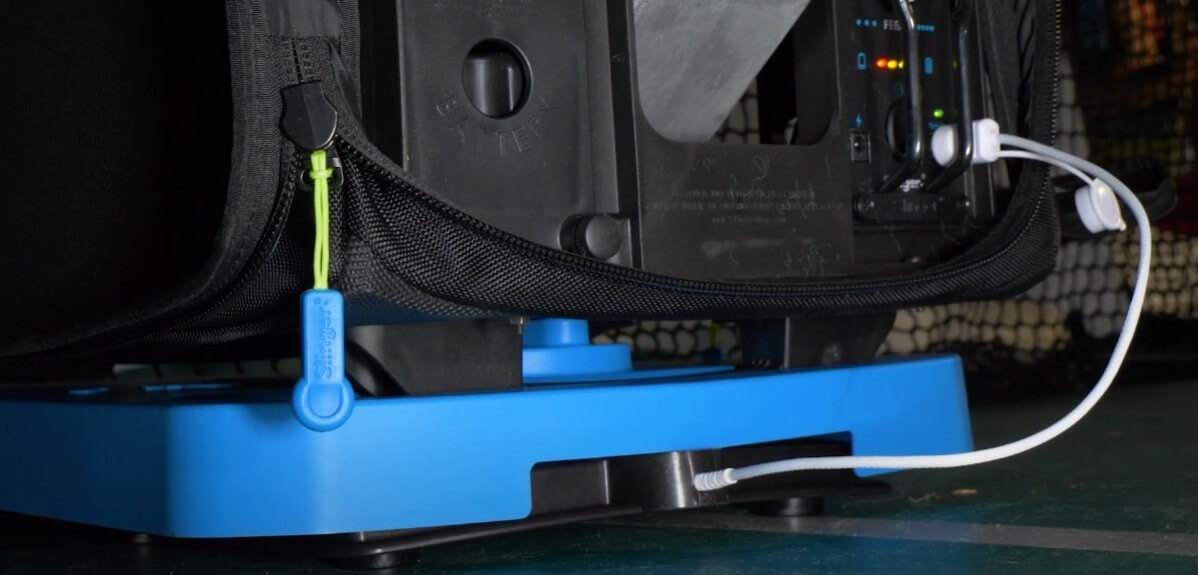
You can also remove the battery and charge it directly if you prefer to leave the bag in the car or in a place without access to a power outlet.
Once you arrive on the court, open the lower front pocket and secure it with the carabiner hook to keep it fully open.

To turn on the Slinger Bag, use the toggle switch, and then you have two buttons to control the speed and ball feed rate. There are four lights to indicate the battery status.
If you’ve never used a ball machine before, don’t worry about tennis ball fuzz. It happens with all ball machines and never goes away.
You can vacuum it regularly, which I recommend, but it will reappear as soon as you use the machine again.
There is a side pocket you can open to access the height adjustment knob that determines the angle at which the ball is ejected, from zero to 40 degrees. Loosen it to adjust and tighten it when you’re satisfied with the angle.

Next, open the top front compartment, which is the ball holder; opening it allows the balls to move in a larger space.
If you’re using the machine for the first time, I recommend keeping the oscillator turned off as you want to play around with court positions first.
To use the oscillator, place the bag on the oscillator base, ensuring the wheels are in the grooves, and then connect it via the white cable that magnetically attaches to the control panel. You can then turn it on using the remote control.
From there, you’re ready, but don’t grab your racket and sprint to the baseline like Nadal just yet.
I suggest using the button to turn on the machine while standing beside it. This way, you can see where the first balls land.
Depending on the speed and bounce location, you may need to make adjustments.
For the initial use and warm-up, I recommend placing the machine behind the “T” of the service boxes, setting the speed slightly below half, and adjusting the angle to around 15 degrees. This will give you a comfortable ball to get into the rhythm.
First Impressions
Before using the Slinger Bag, I had been using the Spinshot Pro 2 ball machine for six weeks. This model is a more traditional ball machine with many features.
Therefore, my expectation for the Slinger Bag was not as high, considering it is three times cheaper and doesn’t offer as many options.
However, my initial experience with the Slinger impressed me. While it may not excel in certain areas compared to the Spinshot, it surpasses it in other aspects, which I will discuss in the following test section.
The first impression I liked was how easy the bag is to move. It tilts effortlessly to access the wheels, and you could easily walk a considerable distance to the courts if needed. Transporting it on public transportation would also not be a problem.
While stairs and rough surfaces like gravel are not easy to navigate, you can easily lift and carry it for short periods, if necessary.
I carried it up and down three flights of stairs multiple times, and although it is bulky, it is light enough for most people to handle. As you can see, it comfortably fits in the trunk of a car.
I particularly appreciate the wheels on the Slinger; they are slim yet sturdy and have a rubbery feel to them. They roll smoothly and feel like the wheels on a well-made suitcase.
Adding a rubber coating to them, as seen on the Slinger, would make rolling, especially on sidewalks, much easier.
Furthermore, I like that the Slinger is a complete package. With other ball machines, you need the machine, ball baskets, and your rackets, which can require multiple trips to the car to gather everything. With the Slinger, everything is included in the bag.
Slinger Bag On Court

The Slinger comes with a cardboard sign that indicates where the machine should be positioned and what settings should be used.
I think the suggestion of using a ball boy is pointless since they would toss you a ball that you catch and then serve. Practicing serves with a ball basket is much easier, and when do club players ever have a ball boy throwing them balls? 😁
My first attempt with the Slinger was indoors, and I simply placed it behind the service line and made the following speed and feed rate adjustments.
After my initial hits, I was surprised by how much topspin the Slinger generates.
I thought the ball might feel a bit lackluster since it doesn’t have the speed of larger machines, but it produces an exceptionally challenging ball with penetrating topspin.
This is because it has only one wheel, whereas other machines use two wheels running at different speeds to create flat shots, topspin, and slices.
I’ve seen some comments that having only topspin is a disadvantage of the Slinger, but I don’t see it as a problem.
I see it as an advantage because as you progress in the game, especially as a junior, you will encounter more and more topspin.
I remember the first time I played against someone who hit the ball with huge topspin from both wings; it was like nothing I had seen before, and my racket’s reaction was so foreign to me that it took several matches to adjust.
The Slinger produces precisely that type of ball, and that’s the kind of ball you want to face because it challenges you and makes you a better player.
You’re fortunate to find more than 2 or 3 players at a tennis club who can hit that kind of spin, so having a machine that can throw ~140 heavy spin balls at you is extremely advantageous.
If you can learn to handle high balls that penetrate deep into the court, you’ll also become better at dealing with moonballs from the dreaded “pusher” that everyone has lost to at some point, regardless of their skill level in tennis.
In my first training session, I hit a whole bag of balls at this setting, and then I placed the Slinger Bag back at the baseline and increased the speed to the maximum while keeping the angle the same. The result was the same, with shoulder-high balls that are really challenging since they engage smaller muscle groups.
Then I turned on the oscillator, which made things even more challenging as you’re now playing high balls on the move, which is quite strenuous.
What Can I Practice with the Slinger Bag?
Despite not having some of the features of other ball machines, with some creative placement on the court, you can practice any type of shot in the game with the Slinger. So far, I have used the Slinger to train the following:
- Groundstrokes
- Volleys
- Half-volleys
- Drive volleys
- Lobs
- Moonballs
- Drop shots
- Cross-court drills
- Footwork drills
Even when the battery was half-empty during a training session, all was not lost because you can place the bag next to you and practice serves without constantly crouching down and picking up balls from the ground.
For many exercises, you don’t even have to move the Slinger; for example, I place it in one of the corners, a few feet inside the baseline and just inside the sideline, from where the ball is shot diagonally into my forehand.
Then I hit several forehands diagonally, move along the line for a few shots, then back diagonally, and then step in and hit a few volleys. You can then move back to get the next ball for more diagonal groundstrokes.
Recommended exercises and settings for the Slinger Bag
| Shot | Speed | Feed Rate | Angle | Placement on the Court |
|---|---|---|---|---|
| Lob / Drive Volley / High Volley | 80% | 50% | 40 degrees | Center, just inside the baseline |
| Mid-court Forehand | 60% | 50% | ~15 degrees | Center, behind the service T |
| Diagonal Groundstrokes | 70% | 50% | ~15 degrees | Sideline, 2 feet inside the service line |
| Hand-fed Ball Type | 20% | 30% | 40 degrees | Your side of the net |
Do you have any exercise suggestions with the corresponding settings? Let me know in the comments.
For more exercise ideas, there are several YouTube videos you can watch. The Tennis Mentor has a whole series on using the Slinger for all skill levels, and there are also other instructional videos by Hammer It Tennis that are worth checking out.
Lastly, many coaches offer stroke analysis if you send them the footage. Therefore, the Slinger is also useful for recording a training session and sending it to them.
It’s not always easy to find a consistent hitting partner, but being able to film yourself hitting 50 forehands in a row with a similar ball will be helpful for a coach.
What’s good

The Slinger Bag stands out for its all-around capabilities. While it may not have all the features found in other ball machines, it offers impressive competition for under €1000.
Instead of operating solely from the center of the court, like my more expensive ball machine, the Slinger Bag allows you to replicate most functions of pricier models through strategic placement and adjustments of speed and launch angle.
A significant advantage of the Slinger Bag lies in its ability to generate topspin effectively. In the recreational realm, most players prefer hip-height balls, which often results in shoulder-high balls being undertrained or even consciously avoided.
However, the Slinger Bag forces you to play precisely those balls, thereby improving your game.
Just look at how professional players on the ATP Tour master shoulder-high balls in the middle of the court—they achieve this through constant repetitions, which a ball machine like the Slinger Bag can help with.
Ultimately, I appreciate the complete solution that the bag offers. Everything you need for a training session is housed in this bag: rackets, balls, ball collector, ball machine, remote control.
You step onto the court, slide it in, and after a few minutes of setup (don’t forget to warm up!), you can start hitting.
What’s bad
One small drawback I noticed was that not all balls make it into the rotating part before falling into the spinning funnel.
This is because there is an edge where balls can get stuck, and typically, about 3 to 10 balls remain there.
One simple solution is to place something behind the Velcro net in the bag—I used air-filled packaging bags often found in oversized Amazon packages. Foam could also be used.
It’s important to note that the issue of balls not falling into the funnel has been resolved in the version 3.0 of the Slinger Bag.
Another criticism for me would be the limited ability of the remote control to adjust speed or feed rate.
I miss the convenience of being able to adjust the speed or frequency from the other end of the court. It’s not a dealbreaker, but a nice convenience. If I hadn’t experienced that with my other ball machine, I might not have thought about it as much.
Is it a problem that you can only generate topspin? Personally, it’s not necessarily an issue for me. Although the Slinger cannot fire flat shots, it’s something that can easily be received from a hitting partner.
Therefore, while only having topspin is a limitation, I didn’t miss it when using the Slinger because I appreciate the challenge of hitting a bouncing ball.
Tipps and Tricks for the Slinger Bag

After several weeks of using the bag multiple times per week, I’d like to share some tips and tricks with you.
Keep a small Phillips screwdriver and a few spare CR2016 batteries in the bag. I’m not sure how long the battery in the remote control lasts; I assume it’s similar to a car key. However, it would be frustrating to arrive on the court and not be able to start the machine.
Regularly charge the Slinger Bag. I recommend performing a charging session before each play. In one of my practice sessions, the battery ran out after 30 minutes because I hadn’t charged it. Normally, the battery lasts me about 3-4 hours. So make sure you’re prepared; otherwise, you’ll only be practicing serves for the rest of the time.
Clean the bag regularly. I recommend removing lint from the control panel and inside the ball machine to avoid excessive buildup. I use a Xiaomi Mini handheld vacuum cleaner for this, which works well. Alternatively, you could use a soft brush with fine bristles to clean hard-to-reach areas.
Use high-quality pressureless balls. My favorites are the Wilson Triniti, which work excellently with a ball machine. Slinger now has a partnership with Dunlop for balls, but I haven’t tested them yet.
Get a second ball tube or basket. The bag comes with a tube that holds 20 balls, but if you have two of them, you can have one in each hand, spending more time training and less time collecting balls.
I would improve the following:
- Enable control of speed and feed rate through the remote control.
- Include a small LCD display to show the battery percentage instead of LED lights.
Do you have any other improvement ideas? Let me know in the comments.
The Slinger Bag is suitable for a wide range of tennis players. It is the perfect ball machine for both ambitious recreational players and aspiring professionals, and it fulfills the exact gift I had wished for as a child during Christmas.
If you’re looking for a personal ball machine that easily fits in your car, is easy to maneuver on the court, and delivers consistent balls to improve your stroke technique, then this would be my recommendation as you won’t find anything better for this price.
While there are more technologically advanced machines available, not everyone has $3000 to spare for what is essentially a luxury toy that shoots tennis balls at you. That’s why I appreciate the value for money this bag offers.
Of course, the Slinger Bag at $800 is still quite expensive, but compared to the over $1000 that many people spend annually on an iPhone, it is relatively more affordable and promotes physical activity as well.
Although primarily designed for personal use, I also see it as a valuable addition for tennis coaches. Some coaches may prefer to invest in a more expensive machine, but for individual lessons where you want to observe a player’s strokes from behind or the side while they play against the machine, it is a useful tool.
Similarly, it is a smart investment for coaches who travel and conduct group training camps for youth players. They can use the Slinger on the court with a group of kids and observe them up close without having to feed balls themselves. It is also easier to transport than heavier machines. So if you teach at a club in the morning and then drive to another location in the city in the afternoon, the Slinger is ideal for this kind of use. They also offer a spare battery that you can use if you’re unable to charge it between training sessions.
Summary
PRO
- Very appealing design
- All in one package
- Easy to transport
- Enormous topspin
- Good price
CON
- Balls sometimes get stuck in the container
- The remote control can be slightly unreliable at a distance
- The oscillator is somewhat cumbersome to carry as an additional item
Questions?
Of course, you can also ask me questions about the Slinger Bag tennis ball machine in the comments.
I’m here to assist you and provide further information.

Comments